Why Your E-Bike Gears Slip Under Power: Causes & Fixes
If you're pedaling hard up a hill and your e-bike gears suddenly skip, it’s frustrating and potentially dangerous. Figuring out what causes electric bike gears to slip under power starts with isolating the variable. Is it mechanical wear?
Or is the motor cutting in and out?
Most riders assume the chain is broken, but often it’s just cable tension or sensor lag. As of 2026, modern e-drivetrains are robust, yet high torque accelerates wear faster than on standard bikes. We’ll walk through the diagnostic steps below to pinpoint the exact fault before you spend money on new parts.
Quick Answer
Gear slippage usually stems from stretched shift cables or worn cassette teeth. High motor torque exacerbates minor indexing errors. Check chain elongation first; replace if it exceeds 0.5%.
If mechanics are fine, inspect sensor calibration.
Start Here: Is It Mechanical Slip or Electronic Glitch?
Before grabbing tools, we need to categorize the failure mode. This distinction saves hours of unnecessary labor. Mechanical slips happen consistently under load.
Electronic glitches feel random or correlate with assist levels.
Ask yourself these three questions:
- Does the slip occur only when applying maximum pedal force?
- Did the issue start after a crash or impact?
- Are there error codes on your display unit?
If the answer to the first question is yes, look at physical components. The chain likely isn’t seating properly on the sprocket. This is a classic derailleur adjustment issue.
If the issue feels erratic, check the electronics. Many mid-drive systems use torque sensors. These measure how hard you push.
If the signal fluctuates, the motor cuts power abruptly. That sudden drop feels like a gear slip, but nothing mechanical moved.
The Critical First Diagnostic Split
We recommend starting the engine (or battery) and spinning the pedals by hand while shifting. Watch the rear derailleur closely. If the cage moves smoothly but the chain skips, suspect wear.
If the cage hesitates or jumps unpredictably, suspect cable tension or housing friction.
For hub-motor bikes, the diagnosis differs slightly. Since the motor doesn’t interact with the drivetrain directly during coasting, slips are almost always mechanical. Focus entirely on the chain, cassette, and derailleur alignment.
Why E-Bikes Feel Different Than Regular Bikes Under Load
Electric assistance adds significant stress to drivetrain components. A typical human rider might produce 200 watts peak. An e-bike system can deliver 250 to 750 watts continuously.
This extra power demands tighter tolerances.
Small imperfections that go unnoticed on a regular bike become major faults here. A slightly bent hanger might cause occasional noise on a manual ride. On an e-bike, that same bend causes violent skipping under torque.
Understanding this sensitivity helps you diagnose faster. Don’t dismiss small issues as "normal wear." They’re critical failures waiting to happen.
Branch 1: Fixing Cable Tension and Indexing Issues
Cable stretch is the most common culprit for slipping gears. Over time, inner wires elongate. This throws off the precise spacing between cogs.
The derailleur no longer aligns perfectly with each sprocket.
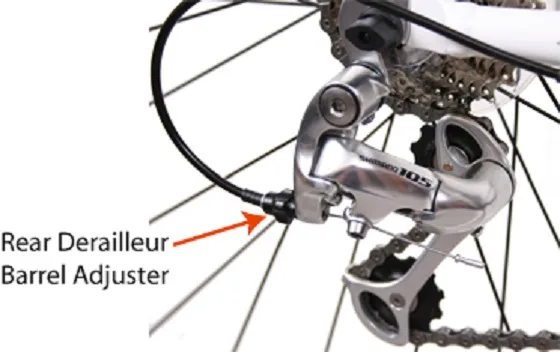
Start by checking your barrel adjuster. This small knob sits where the cable enters the derailleur or shifter. Turn it counter-clockwise to add tension.
Do this in quarter-turn increments. Test ride after each adjustment.
If turning the barrel adjuster doesn’t fix the slip, the cable may be frayed. Inspect the exposed wire near the shifter lever. Look for rust or broken strands.
Replace the cable set if you see damage. Housing compression also plays a role. Old, crushed housing prevents smooth cable movement.
Swap it out if it feels gritty when pulling the shifter.
The Barrel Adjuster Workflow for Minor Slips
Follow this simple sequence to recalibrate your indexing:
- Shift into the smallest cog.
- Loosen the cable anchor bolt on the derailleur.
- Pull the cable taut with pliers.
- Retighten the anchor bolt securely.
- Fine-tune using the barrel adjuster until shifts are crisp.
This resets the baseline tension. Most minor slipping disappears immediately after this process. Remember, proper indexing ensures the chain drops cleanly onto each tooth profile.
Poor indexing lets the chain ride high on the teeth, causing it to skate off under pressure.
Checking for Stretched Cables or Frayed Housing
Inspect the entire cable path. Remove the outer casing if possible. Look for kinks or debris inside.
Dirt accumulation increases friction significantly. Clean the housing with compressed air or a dedicated cable lube injector.
If the cable sticks anywhere along its route, the derailleur won’t return quickly enough. This delay causes missed shifts or partial engagement. Partial engagement leads to slipping.
Ensure the cable slides freely within the housing. Apply light lubricant to the inner wire if needed. Avoid heavy greases that attract grit.
Thin oil works best for precision shifting systems.
Branch 2: Inspecting Chain Wear and Cassette Damage
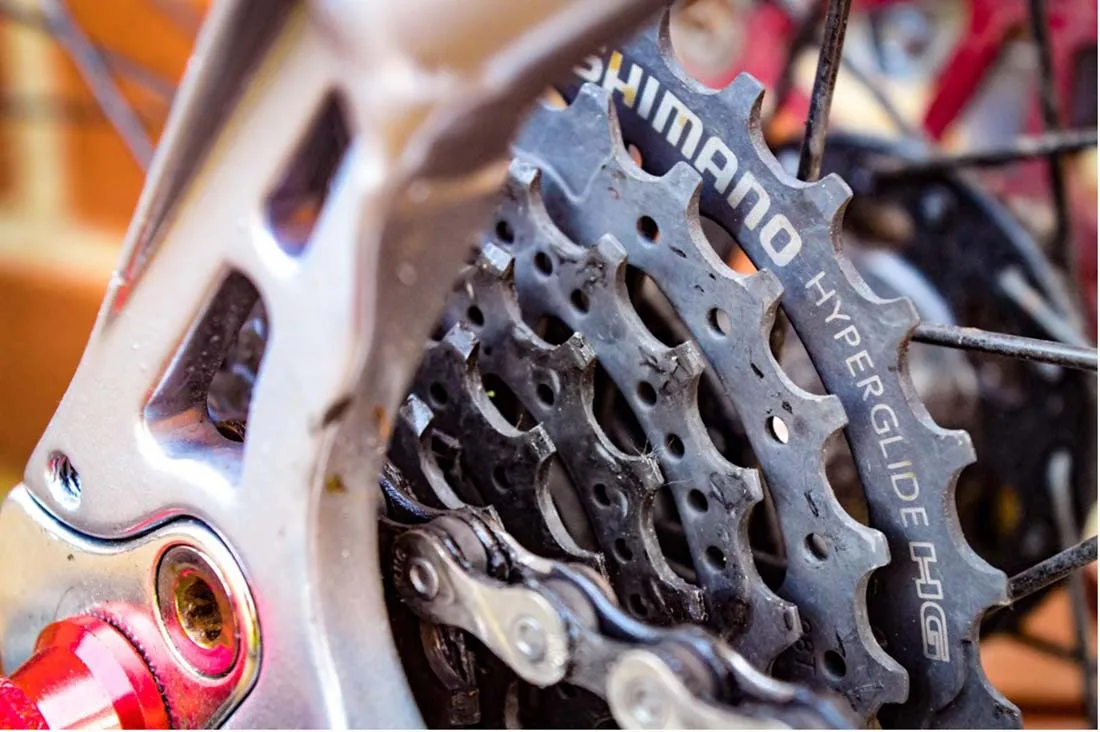
Worn chains are the silent killers of drivetrains. As a chain stretches, its pitch changes. It no longer fits snugly between the cassette teeth.
Instead, it rides up on the peaks of the sprockets. Under high torque, the chain simply pops off.
You must measure chain elongation accurately. Visual inspection isn’t enough. Use a dedicated chain checker tool.
Insert it into the chain links. If the tool drops in fully, the chain is past its service life.
Manufacturer specifications indicate replacement thresholds vary by speed count. For 10-speed systems, replace at 0.5% elongation. For 11 or 12-speed setups, the tolerance is tighter.
Replace at 0.25% to 0.5% depending on the brand guidelines. Ignoring this metric destroys your expensive cassette.
How High Torque Accelerates Component Failure
E-bike motors apply sudden bursts of power. This shock loading stresses metal fatigue cycles. Aluminum cogs wear faster than steel ones.
Many entry-level e-bikes use aluminum cassettes to save weight. These degrade quicker under electric assist.
Check the tooth profiles visually. Look for shark-fin shapes. Healthy teeth have symmetrical ramps.
Worn teeth develop hooked leading edges. This hook catches the chain incorrectly. It forces the chain upward rather than guiding it inward.
Replace the cassette if you see pronounced hooks. Never install a new chain on a worn cassette. The mismatch will cause immediate slipping.
Using a Chain Checker Tool Correctly (0.5% vs 0.75%)
Place the bike on a stand. Rotate the cranks backward slowly. Insert the checker pin into the chain.
Read the indicator window.
| Elongation Level | Status | Action Required |
|---|---|---|
| Below 0.5% | Good | Monitor regularly |
| 0.5% – 0.75% | Warning | Plan replacement soon |
| Above 0.75% | Critical | Replace chain and inspect cassette |
Riding beyond 0.75% guarantees rapid cassette wear. The cost savings from delaying replacement pale compared to buying a new cassette later. Precision matters here.
Even 0.1% difference impacts shifting quality on high-performance e-systems.
Branch 3: Aligning the Derailleur Hanger and Limit Screws
A bent derailleur hanger misaligns the entire mechanism. This is common after minor tip-overs or parking lot bumps. The hanger acts as a sacrificial part.
It bends instead of breaking the frame or derailleur.
Visual alignment checks are tricky. Use a hanger alignment gauge for accuracy. Thread the gauge into the derailleur mount.
Spin it around the rim. Note the distance between the gauge arm and the wheel rim at 12, 3, 6, and 9 o’clock positions. Variations greater than 2mm indicate a bend.
Straighten the hanger carefully using the gauge leverage. If the metal cracks during bending, replace the hanger immediately. Do not attempt to weld aluminum hangers.
They lose structural integrity. Always verify alignment before adjusting limit screws.
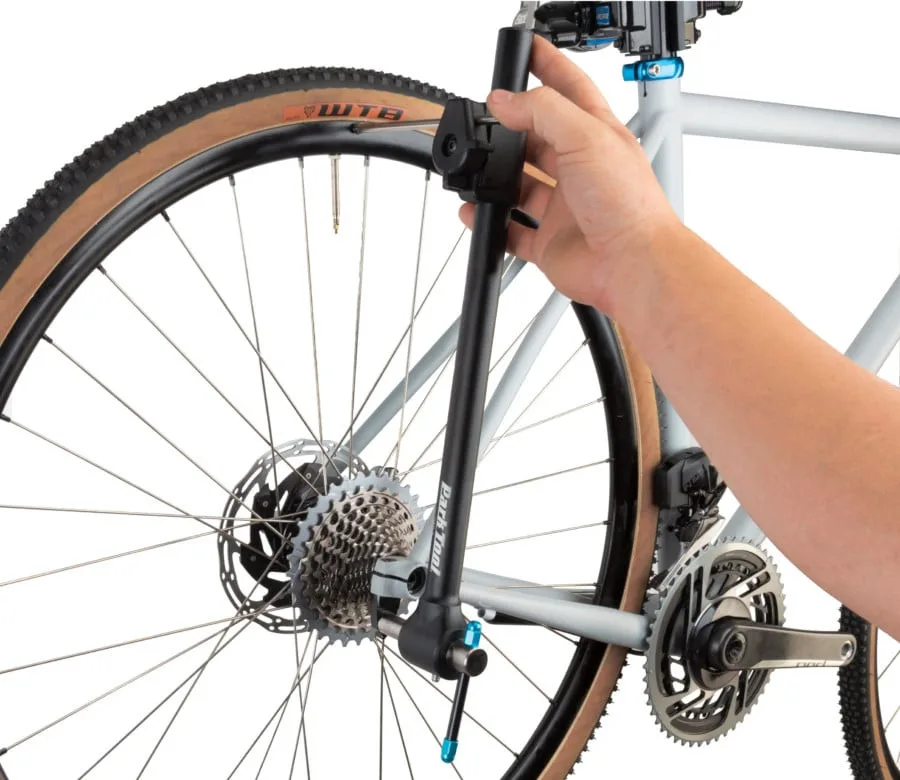
Spotting Bent Hangers After Impacts
Look for asymmetry in the gap between the jockey wheels and the cassette. On a straight hanger, this gap remains consistent across all gears. A bent hanger creates varying distances.
The chain may rub against the spokes in certain positions.
Listen for grinding noises during rotation. Rubbing sounds often accompany slight bends. Catching the chain on the largest cog suggests inward bending.
Dropping the chain off the smallest cog indicates outward bending. Address these geometric errors before tweaking tension. No amount of cable adjustment fixes fundamental misalignment.
Setting High/Low Limits to Prevent Spoke Contact
Limit screws control the derailleur’s travel range. The Low (L) screw prevents dropping into the spokes. The High (H) screw stops overshifting off the smallest cog.
Shift to the largest cog. Adjust the L screw until the top pulley aligns directly beneath it. Shift to the smallest cog.
Adjust the H screw similarly. Tighten gradually. Quarter turns make big differences.
Incorrect limits cause catastrophic failures. If the chain falls into the spokes, it jams instantly. This locks the rear wheel.
At speed, this causes crashes. Verify both limits carefully. Ride briefly in a safe area to test extreme shifts.
Ensure the chain stays secure throughout the full range.
When to Stop DIY: Sensor Lag and Motor Cutouts
Sometimes, the hardware is perfect. The problem lies in software or electrical connections. Mid-drive systems rely on sensors to determine assistance levels.
Cadence sensors measure pedal speed. Torque sensors measure pedal force.
Faulty sensors send erratic data to the controller. The motor reacts inconsistently. You might experience sudden power drops.
These feel like gear slips because propulsion halts abruptly. Check your display for error codes. Consult the manufacturer’s manual for specific code definitions.
Loose connectors cause intermittent signals. Inspect wiring harnesses near the bottom bracket. Look for chafed insulation or corroded pins.
Moisture ingress damages sensitive electronics. Dry contacts with electrical cleaner if oxidation appears. Secure loose plugs firmly.
Distinguishing Ghost Shifting from Mechanical Skip
Ghost shifting refers to automatic gear changes without user input. This happens when voltage fluctuations affect electronic derailleurs. Battery depletion often triggers this behavior.
Charge the battery fully to rule out power starvation.
Mechanical skips involve physical chain movement. You hear clanking or feel vibration. Ghost shifting is silent or accompanied by motor whine adjustments.
Identify the sensory cue correctly. Audio clues help differentiate mechanical rattles from electronic hums. If the chain physically moves position without pedal input, suspect interference or stuck cables.
Reading Error Codes on Bosch, Shimano, or Brose Displays
Major manufacturers provide diagnostic apps. Bosch uses the Flow app. Shimano offers the E-TUBE Project.
Connect via Bluetooth to read detailed logs. These apps reveal hidden faults invisible on the basic display.
Look for sensor calibration warnings. Recalibrate the torque sensor if prompted. Follow the on-screen instructions precisely.
Improper calibration leads to unsafe assistance spikes. Reset the system to factory defaults if errors persist. Visit an authorized dealer if software updates fail.
Hardware replacements may be necessary for internal motor faults.
Maintenance Schedule to Prevent Future Slipping
Preventive care beats reactive repair every time. E-bike drivetrains endure higher stress than standard bicycles. You need a stricter maintenance routine to keep components aligned and lubricated.
Aggregate user reviews show that neglecting cleaning accelerates wear significantly. Dust acts as an abrasive paste when mixed with old grease. This grime eats away at chain rollers and cassette teeth rapidly.
Establish a service interval based on your riding conditions. For dry, dusty environments, clean the drivetrain every 200 miles. In wet or muddy conditions, reduce this to 100 miles.
Use a degreaser specifically formulated for bike chains. Avoid harsh solvents like brake cleaner, which strips protective coatings from seals. Rinse thoroughly with water before applying fresh lubricant.
Lubrication Types for Wet vs. Dry Conditions
Choosing the right lube matters more than you think. Dry lubes attract less dirt but wash off easily in rain. Wet lubes stay put but collect grime faster.
Match the product to your typical weather patterns. If you commute year-round in varied climates, consider a ceramic-based formula. These offer balanced performance and longer lasting protection.
Apply lubricant sparingly to each roller while back-pedaling. Let it penetrate for five minutes. Wipe off all excess from the outer plates.
Excess surface lube is useless and dirty. It attracts particles that grind into the mechanism. Cleanliness ensures smooth shifting and reduces friction heat.
Heat degradation weakens metal structures over time.
Service Intervals Based on Mileage and Terrain
Check cable tension monthly if you ride frequently. Cables stretch naturally during initial use. Re-indexing takes only ten minutes.
Inspect the hanger alignment after any minor impact. Even small bends affect precision under torque. Replace chains once they hit the 0.5% elongation mark.
Never wait for visible skipping. By then, the cassette is likely damaged too.
Professional shops recommend full drivetrain inspections annually. They use specialized tools to measure wear accurately. DIY checks are good, but pro diagnostics catch subtle issues early.
Investing $50 in a tune-up saves hundreds in part replacements later. Consistency is key. Stick to the schedule even when everything seems fine.
Prevention is cheaper than cure.
Frequently Asked Questions
Why do my e-bike gears slip only uphill?
Uphill climbs demand maximum torque output from the motor. This high load exposes minor indexing errors invisible on flat ground. The chain struggles to seat deeply enough on worn teeth.
Under heavy resistance, it skates upward instead of engaging properly. Check your chain wear first. If the chain is new, adjust cable tension slightly tighter.
This compensates for the increased force applied to the derailleur spring.
Can I fix slipping gears without replacing parts?
Often, yes. Simple adjustments resolve most mechanical slips. Tightening the barrel adjuster restores proper cable tension.
Cleaning a dirty derailleur pivot removes sticking points. Aligning a bent hanger corrects geometric misalignment. However, worn components cannot be saved.
Chains and cassettes have finite lifespans. If teeth look hooked or sharp, replacement is mandatory. No amount of tuning fixes physical deformation.
Assess wear levels before attempting complex repairs.
Does using higher assist modes cause more gear slipping?
Yes, indirectly. Higher assist settings deliver more power instantly. This sudden torque spike stresses the drivetrain harder.
Components experience greater shock loads during shifts. Frequent use of Turbo mode accelerates chain and cassette wear. Consider moderating assist levels during technical sections.
Smooth pedaling inputs reduce strain on the mechanism. Let the motor do the work gently rather than aggressively. This extends component life and improves shift reliability.
How often should I replace my e-bike chain?
Replace it sooner than you would on a regular bike. Aim for every 1,500 to 2,000 miles. High torque stretches chains faster.
Check elongation monthly using a chain checker tool. Replace immediately if it reads 0.5% or higher. Ignoring this threshold ruins expensive cassettes.
A new chain costs $20. A new cassette costs $80+. Regular inspection saves money.
Keep a spare chain on hand for quick swaps. This prevents being stranded with a broken drivetrain.

Similar Posts